Why You Should Know How To Remove Water Softeners Yourself
We’ve outlined the procedures you need to follow to remove a water softener in this tutorial, regardless of whether you’re moving, upgrading your current water softener, or simply switching back to hard water in your house.
How To Drain A Water Softener?
What should you do if you check your water softener and see water in the tank?
While your water softener’s brine tank shouldn’t ever be completely full of water, certain models may contain a little amount of moisture.
If you have an old water softener, it can have a “wet” brine tank. In this scenario, water will constantly be present in your brine tank. Usually, this sort of brine tank can hold 11 to 23 liters (3-6 gallons) of water, or 15 to 25 centimeters (6-10 inches).
A dry brine tank will be present with a modern softener. In this scenario, your softener won’t need to go through a regeneration cycle for more than an hour or two after you fill your tank with water. While your softener is in between cycles, it shouldn’t have water in it. How then do you empty a water softener? Here are your principal choices:
Scoop Out The Water
Using a cup or bucket, remove the water from your water softener.
Get a fresh cup or bucket: Use a big scoop or dish or a bucket that is small enough to fit within your brine tank.
Scoop out the water: Manually scoop out the water and pour it into a bigger container for drain disposal.
Use a Shop Vacuum
Your water softener tank’s water can be sucked up by a shop vacuum, sometimes referred to as a shop-vac.
Choose a shop vac that can be used for both wet and dry applications because not all of them can suction up water.
Remove The Tank & Dump The Water
Feel free to disconnect your tank and pour the softener water down the drain because it doesn’t present a threat to the environment.
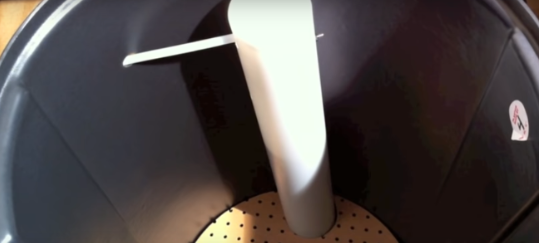
To achieve this, you’ll need to remove the brine well. This is the long cylinder within your brine tank that houses the safety float.

Manual Regeneration Cycle
Possible manual regeneration options for your water softener.
Push and hold the “regenerate” button to start a manual regeneration cycle that will empty the softener. Your water softener automatically removes all of the water from the brine tank during regeneration.
Push the button once more to bypass the brine cycle after the regeneration cycle has begun. Push the button to restart your water softener once all of the previous cycles have finished when your tank is empty.
The same may not apply to all models. Be careful to check your handbook, or contact an expert for assistance.
How to Clean a Water Softener?
You will only need to clean a modern water softener once every five to ten years. Older machines, however, require annual cleaning. How to clean your water softener is as follows:
Empty The Tank
You must siphon or dump all of the water from your tank before getting rid of any extra salt. Dissolve any residual bridges or blocks in hot water if you have any.
Clean The Interior
Fill the tank with 4 to 8 litres of water and plenty of dish soap. Scrub the interior of the tank’s sides and bottom with a brush that has a long handle.
Rinse The Tank
After draining the soapy water, thoroughly rinse the interior with fresh water.
Disinfect The Water Softener with Bleach
Next, fill the tank with a solution made by combining 1/4 cup of household bleach with 8–11 liters of water. After giving the bleach solution a thorough stir, leave it alone for about 15 minutes. After draining the bleach solution, thoroughly clean the tank once again with clear water.
Refill The Tank
As usual, add water and salt to your tank. The salt needs time to dissolve in the water, therefore it’s a good idea to wait a few hours before starting the regenerative cycles once more.
How To Uninstall A Water Softener: Step-By-Step
Observe these procedures to remove a water softener from your plumbing system:
Step One: Gather the Supplies Needed
Gather the equipment and materials you’ll probably need for the project before you begin. A large bucket, a wet vac, which is optional, a towel, a wrench or slip joint pliers, and a screwdriver are among these.
Step Two: Shut Off Your Water Supply Or Bypass The Water
The water supply to the water softener must then be turned off. This is often the water supply for the entire house.
If your water softener includes a bypass, all you need to do is open the bypass valve to force water around the device, thereby turning off the water supply without completely cutting off your water supply.
The valve should typically be twisted clockwise to turn off the water.
Step Three: Unplug the system
The majority of water softeners require power to function. Pull the plug out of the wall if your water softening system is hooked into an electrical outlet to turn off the electricity.
You are now prepared to proceed to the following stage because the softener is now isolated from your water and electrical supply.
Step Four: Drain The Water Softener
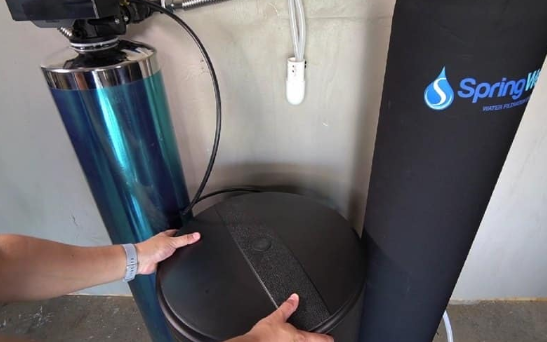
The water should then be drained from the system. When a softener is working, water is kept in the brine tank where it combines with salt to create a brine solution.
You would have to put more effort into disconnecting a softening system before emptying it. The brine tank will be significantly heavier, and there is a considerably greater chance of leakage.
Depending on the kind of system, you have a few choices for draining the softener:
You can use a hose bib. It is probable that your large water softener includes a hose bib to which you may connect a garden hose. For rapid and easy draining, direct the hose to a nearby drain.
Besides, you can also use the drainage tap. By activating the drainage faucet at the tank’s bottom, you may drain the water from other water softeners. You will want a pail to collect the water, and you will most likely need to operate in batches.
You may also consider a manual option. If your softener doesn’t have one of these alternatives, you might think about a manual drainage option. Use a big bucket or scoop to remove the water from the tank. You may also use a wet vac, also known as a shop vac, to remove the water in batches.
Some water softener systems incorporate a relief valve for easy and rapid emptying. This valve should be checked before you begin draining.
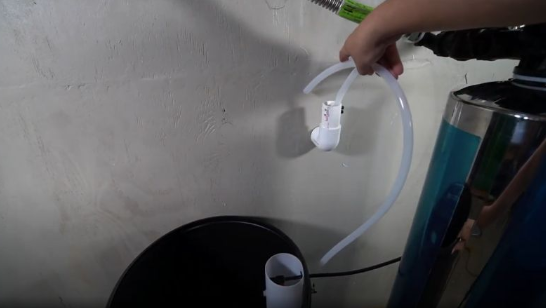
Step Five: Disconnect the Outlet Pipe
The outlet line, which is the conduit that delivers soft water to your plumbing system, may be disconnected once you’ve removed as much water as you can from your salt tank.
Put a cloth or a bucket under the connection before you begin to collect any leaks. The coupling that connects the softener to the supply pipe can be loosened using a wrench or slip joint pliers.
Step Six: Disconnect the Inlet Pipe and Drain Line
To disconnect the inlet pipe of the water softener, repeat the procedure on the softener’s other side. Use a towel or a pail to mop up any water that has been spilled.
If the drain line is connected to a drain pipe or waste system, proceed to disconnect the drain line.
Step Seven: Remove The Remaining Bolts & Connections
Then, take off any last-minute fasteners, straps, or connections holding the water softener in place where it was originally installed.
You should now totally unplug the water softener.
Ideally, you can maintain the water routed via the main water line without needing to replace a portion of plumbing if your water softener was put on a separate loop from your water supply.
What To Do With An Old Water Softener
Using an ancient water softener, you might accomplish the following things:
Sell it
Selling the water softener for a few hundred dollars on a used market is possible if it is still in good condition and you have taken good care of it.
Send it to a Specialist Company
Water softener disposal is a specialty of certain nearby businesses. To receive the greatest deal, speak with many businesses.
Recycle it
Tanks and other components of most water softening systems are recyclable. If you’re unsure, see your user manual or get in touch with the maker.
Just Trash it
You may, as a final option, throw away your water softener. As the brine and resin in softening systems are harmless and don’t contain any dangerous ingredients, they may be thrown away with the trash.
How To Refill The Salt Tank
You must use the right quantity of salt in your water softener to keep it operating at its best.
Here are three straightforward guidelines to follow: Always keep your brine tank at least one-quarter full of salt; don’t fill it up past 4 to 6 inches below the top of the tank; ensure that the salt level always remains a few inches above the water level in the tank; and check the salt level in your brine tank at least once per month to determine when to add more salt.
How To Remove Salt Bridges
One of the most frequent problems with water softeners is a salt bridge.
As salt forms in an arc above the water level, salt bridges can be formed, leaving a space between the salt and the water. High humidity or using the incorrect sort of salt in your tank are two potential culprits.
When this occurs, your water softener is unable to function because the brine solution cannot get to the salt in your brine tank with the salt bridges.
Using a rubber mallet, gently hammer the tank’s outside to dislodge the salt bridge. You may also soak the bridge in hot water to disintegrate it. If doing so doesn’t disassemble the bridge, try cutting through the salt bridge with a long tool, such as a broom handle.
Once the salt bridge has been destroyed, use all the remaining salt before cleaning out your brine tank. Let a few hours or four hours for a brine solution to form before cleaning your brine tank, and then manually renew your water softener.
FAQ
How long does it take to remove a water softener?
The good news is that taking out water softeners goes considerably more quickly than putting them in. Depending on your DIY skills and whether your water softener has any features that make the operation simpler, such as a hose bib or a tap for fast-draining the system, the entire de-installation procedure ought to take 30 to 60 minutes.
Can anyone remove a water softener?
A water softener may be disconnected from a home’s main plumbing line and removed by anybody. Just be sure to take all essential safety steps, such as turning off or bypassing your water supply before you begin to prevent serious leaks. A family member who is handy can assist you if you are unsure.
What happens if I just unplug my water softener?
Just disconnect the system and turn on the bypass to move water through the unit to cease utilizing your water softener. But, if you’ve made the decision that you no longer want to utilize a water softener, this is definitely not the greatest long-term fix.
Due to the stagnant water remaining for months or years without usage, the water softener will eventually gather bacteria, algae, and other undesirables. It is thus recommended to empty and disconnect your water softener as soon as possible.
How do you decommission a water softener?
A water softener may be turned off by simply turning off the electricity, emptying it, and unplugging it from your plumbing. To avoid leaks when you remove the unit, be sure to redirect water around the softener.