Introduction
Clean and safe drinking water is essential for a healthy lifestyle. One effective way to ensure your water is free from harmful microorganisms is by installing a UV water purifier system. UV water filters use ultraviolet light to disinfect water by deactivating bacteria, viruses, and other pathogens.
In this article, we’ll guide you through the process of installing a UV water purifier, step by step.By the end of this guide, you won’t be asking yourself how to install a UV water filter ever again.
How to Install a UV Water Purifier System
How to install a UV Water filter? Installing a UV system might seem like a daunting task, but with the right tools, equipment, and a bit of patience, you can enjoy the benefits of clean and safe drinking water.
Here’s a detailed breakdown of the installation process:
Tools/Equipment Needed
Before diving into the installation, gather all the necessary tools and equipment. Having everything ready will make the process smoother and more efficient. Here’s what you’ll need:
- UV Water Purifier System: Purchase a reliable UV system from a reputable manufacturer. Make sure it’s suitable for your household’s water flow rate and capacity.
- Mounting Brackets and Screws: These are essential for securely attaching the purifier system to the wall.
- Wrenches and Pliers: These tools will help you tighten fittings and connections during the installation.
- Tubing and Fittings: You’ll need tubing to connect the water lines to and from the purifier. Fittings ensure a secure and leak-free connection.
- Shut-Off Valves: Installing shut-off valves on both sides of the purifier unit allows you to stop water flow for maintenance without affecting the rest of your water supply.
- Teflon Tape: This tape is used to create a watertight seal when attaching fittings.
- Drill and Bits: You’ll need a drill to create holes for the mounting brackets and screws.
- Marker: A marker will help you accurately mark the positions for drilling and attaching brackets.
Installation Process
Now that you have all the necessary tools and equipment, it’s time to proceed with the installation process step by step:
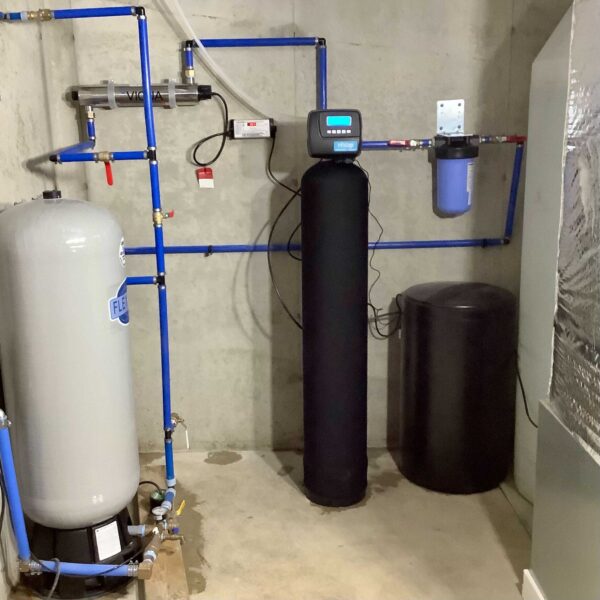
Select an Appropriate Location: Choose a location for your UV system that is easily accessible and after any other water treatment systems you may have. This positioning ensures that the water entering the UV chamber is already relatively clean.
Mark the Mounting Spots: Use a marker to mark the spots where you’ll be attaching the mounting brackets. Ensure that the unit will be level when installed.
Attach Mounting Brackets: Use your drill and appropriate bits to attach the mounting brackets to the wall. Make sure they are securely fastened.
Install Shut-Off Valves: Install shut-off valves on both the inlet and outlet sides of the purifier unit. These valves will allow you to stop the water flow when you need to perform maintenance on the system.
Insert the Quartz Sleeve: Follow the manufacturer’s instructions to insert the quartz into the purifier UV chamber. This protective sleeve ensures that the ultraviolet light reaches the water while keeping the lamp separated.
Connect Tubing and Fittings: Connect the tubing to the inlet and outlet of the purifier unit. Use the appropriate fittings to ensure a tight and secure connection.
Check for Leaks: Before proceeding, check all connections for leaks. Turn on the water supply and observe for any signs of water leakage around fittings and connections.
Install the UV Lamp: Turn off the water supply and open a nearby faucet to release any pressure. Install the UV light according to the manufacturer’s guidelines. Be cautious not to touch the lamp with your bare hands, as oils from your skin can affect its efficiency.
Test the System: Once the lamp is securely in place, turn on the water supply and plug in the purifier unit. Test the system by running water through it and checking for any leaks.
By following these steps and taking your time to ensure everything is properly installed, you can successfully set up a UV system in your home. This system will play a vital role in providing you with safe and clean drinking water for you and your family.
How to Install a UV Lamp
Installing a UV light is a critical part of setting up your UV system. This component is responsible for emitting the ultraviolet light that effectively deactivates harmful microorganisms in your water. Here’s a closer look at the process:
Tools/Equipment Needed
Before you start the UV lamp installation, gather the following tools and equipment:
- Replacement UV Lamp: Make sure to purchase a compatible replacement UV light from the same manufacturer as your purifier system.
- Gloves: Wear gloves to prevent transferring oils and contaminants from your hands to the lamp.
- Cloth: A clean cloth is needed to wipe down and clean the sleeve (quartz).
- Cleaning Solution: Use a cleaning solution recommended by the manufacturer to clean the sleeve (quartz) effectively.
Installation Process
Now, let’s walk through the step-by-step process of installing a UV lamp:
Disconnect Power and Water: Before handling any components, make sure your UV system is disconnected from both the power source and water supply.
Wear Gloves: Put on your gloves to prevent any oils or residues from your hands from adhering to the lamp.
Clean the Quartz Sleeve: Gently remove the quartz sleeve from the purifier UV chamber. Use a clean cloth and the appropriate cleaning solution to wipe down the quartz sleeve. This ensures that the UV rays can penetrate the water without any obstructions.
Remove the Old UV Lamp: Carefully remove the old UV light from its socket. Depending on the design of your purifier, you might need to unscrew or unclip the UV lamps.
Insert the New UV Lamp: Take the new UV light and insert it into the socket in the same orientation as the old lamp. Be careful not to touch the lamp with your bare hands, as the oils from your skin can affect its performance. If you accidentally touch the lamp, clean it with a soft, lint-free cloth and rubbing alcohol.
Reassemble the Unit: Put the quartz sleeve back into the purifier UV chamber according to the manufacturer’s instructions. Make sure the UV chamber is positioned properly and secured.
Check Connections: Double-check that all connections are properly secured, including the quartz sleeve and the UV light. Any loose connections can lead to leaks or reduced efficiency.
Power On the Unit: Reconnect the power and water supply to the UV system. Plug the unit back in and turn it on.
Test the New Lamp: Run water through the purifier system and observe the new lamp’s functionality. Some systems might have indicator lights that show whether the lamp is working.
By following these steps, you can successfully install a new UV lamp in your water purifier system. This step is crucial for maintaining the effectiveness of your system in disinfecting water and ensuring that you and your family have access to clean and safe drinking water.
Remember to consult your purifier’s manual for specific instructions, as installation methods can vary between different models and manufacturers.
Things to Consider when Installing a UV Purifier
When installing a UV water filter, there are several important factors to keep in mind to ensure optimal performance, convenience, and ease of maintenance. Let’s delve into these considerations:
Locate the UV Unit After Other Water Treatment Systems
Positioning your UV water filter in the right sequence within your water treatment setup is crucial for effective water UV disinfection. Place the UV unit downstream from any other treatment systems you might have, such as sediment filters or carbon filters.
This arrangement ensures that the water entering the UV chamber is relatively free from debris and particles that could block or shield microorganisms from the UV light. In this way, the UV water filter can focus on targeting pathogens rather than larger impurities.
Mount the UV Water Purifier to a Wall
Mounting your UV water purifier system to a wall has several benefits. It saves space, keeps the unit secure, and prevents accidental damage that might occur if it’s placed on a countertop or in a less stable location. A wall-mounted unit is also more accessible for routine maintenance tasks such as lamp replacement and cleaning.
Install a Shut-Off Valve on Either Side of the Unit
Including shut-off valves on both the inlet and outlet sides of your UV water purifier system is a practical measure. These valves allow you to isolate the purifier from the rest of your water supply when performing maintenance tasks.
Shutting off the valves prevents water from flowing into or out of the purifier, making it easier to change the lamp or clean the system without affecting the water supply to the rest of your home.
Keep an Extra Quartz Sleeve and Lamp on Hand
Having spare components readily available can save you time and hassle in the long run. Keeping an extra sleeve (quartz) and UV lamp on hand allows you to quickly replace these components in case of unexpected failure or when it’s time for routine replacement.
This precaution ensures that you won’t experience prolonged downtime in your water purification system, which is especially crucial if your household relies heavily on the purified water.
By taking these considerations into account during the installation process, you’ll set the stage for a well-functioning UV water filter that provides consistent and reliable access to clean and safe drinking water.
These steps not only enhance the efficiency of your system but also contribute to its long-term durability and ease of maintenance.
Final Verdict/Conclusion
In the pursuit of clean and safe drinking water, installing a UV water purifier system is a wise choice. This technology effectively eliminates harmful microorganisms, ensuring the water you and your family consume is free from waterborne illnesses.
By following the installation steps outlined in this article and considering important factors such as the unit’s location, valves (shut off), and pre-filters, you can set up a UV water purifier system that delivers reliable and consistent results.
Remember that the UV lamp is the heart of your system, responsible for the water’s UV disinfection. Regularly replacing the lamp, ideally on an annual basis, is essential to maintain the effectiveness of the system.
The inclusion of a pre-filter helps enhance the UV water filter efficiency and extends the life of the lamp and other components.
By adhering to these guidelines and maintaining your UV water filter, you’re ensuring a continuous supply of clean, safe, and great-tasting water for you and your loved ones. Investing the time and effort in proper installation and maintenance pays off in the form of peace of mind and improved overall health.
FAQs
Can I install a UV water purifier myself?
Yes, many UV water purifier systems are designed for easy installation. Just make sure to follow the manufacturer’s instructions closely and gather the necessary tools and equipment.
Are UV water purifiers effective against all types of microorganisms?
While UV purifiers are highly effective against bacteria, viruses, and other microorganisms, they may not remove other contaminants like heavy metals or chemicals. Consider the specific needs of your water source.
How do I know if my UV lamp is working?
Some UV purifiers have indicator lights that signal when the lamp is operating. You can also perform visual inspections. If the lamp appears dark or shows signs of wear, it’s time for a replacement.
Can I install a UV purifier on well water?
Absolutely. UV purifiers are commonly used for well water to eliminate harmful microorganisms that might be present.
Is a UV water purifier maintenance-intensive?
Not particularly. Regular lamp replacement and occasional quartz sleeve cleaning are the main maintenance tasks. The benefits far outweigh the minimal maintenance effort.
With these FAQs, we hope to address common concerns you might have about installing and maintaining a UV water purification system. It’s important to stay informed and proactive to ensure the long-term success of your water purification efforts.
Hopefully after reading this guide, you’ll have a much better idea on knowing how to install a UV water filter.