Introduction
Brita pitchers are a popular choice for water filtration at home. They are simple to use, affordable, and effective in removing contaminants from your water. If you are new to using a Brita pitcher, you may have some questions on how to properly use and maintain it.
In this article, we will discuss the step-by-step guide on how to use a Brita pitcher, how often to change the filter, and some common troubleshooting tips.
But first, let’s understand the importance of water filtration. Tap water can contain various impurities, such as chlorine, sediment, heavy metals, and microorganisms, that can affect the taste, odor, and quality of your water.
Moreover, some of these contaminants may pose a health risk, especially to vulnerable populations such as children, pregnant women, and people with weakened immune systems. By using a Brita pitcher, you can reduce the levels of these impurities, making your water safer and healthier to drink.
We’ll explain the step-by-step procedure for using a Brita pitcher for the first time and on a regular basis in this tutorial on how to use a Brita pitcher. Moreover, we’ll explain how to change a Brita filter.
How to Use a Brita Pitcher For the First Time
When it comes to how to use Brita pitcher, it is a simple process, and it starts with assembling the pitcher. Typically, a Brita pitcher consists of a pitcher jug, a filter cartridge, and a filter indicator. The filter cartridge is the heart of the pitcher, as it is responsible for removing impurities from your water.
In summary, before using your Brita pitcher for the first time, you will need to follow a few simple steps to ensure that you get the best results. Firstly, you should begin by soaking the filter cartridge in cold tap water for 15 minutes.
This step is essential because it helps to activate the filter and ensures that it functions correctly. Once you have soaked the filter, you will need to rinse it under running water for 30 seconds to remove any loose carbon particles.
Next, you can fill the pitcher with cold tap water and allow it to run through the filter. It is essential to note that the first few pitchers of filtered water may contain some carbon particles. However, this is normal and does not affect the quality of your water. To remove any remaining carbon particles, you should discard the first two pitchers of filtered water.
Once you have discarded the first two pitchers of water, your pitcher is ready to use. You can now fill it with cold tap water, and the filter will remove any impurities, including chlorine, copper, and mercury, ensuring that you have clean, fresh-tasting water every time you pour.
You can also keep track of the filter’s lifespan by using the filter indicator, which will let you know when it’s time to replace the filter cartridge.
Overall, using a pitcher is an excellent way to enjoy clean, fresh-tasting water while also reducing your environmental footprint. By following these simple steps, you can ensure that your Brita pitcher functions correctly and provides you with clean water for up to two months before needing replacement filters.
Remove the Pitcher From the Packaging
Take the pitcher out of the box and throw away the wrapping. Take out the individual components, such as the filter and the user guide, and place them aside.
After removing the packaging materials, you can take out the individual components that come with the pitcher, such as the filter and the user guide. You can place these items aside and keep them in a safe and accessible location for future reference.
It is also essential to inspect the pitcher for any damage that may have occurred during shipping or handling. If you notice any cracks, chips, or other damage, you should contact the seller or Brita customer service to request a replacement or replacement filters. Keeping the packaging materials may also be necessary in case you need to return the item.
Overall, removing the pitcher from its packaging is the first step in setting up your new pitcher. Taking care to inspect the pitcher for any damage, discarding the packaging materials properly, and reading the user guide will help you get the most out of your Brita pitcher for years to come.
Wash the Pitcher
Put hot, soapy water in a tub. Place the pitcher’s whole contents in the water after removing the top reservoir and lid. Using a sponge, clean the objects. It is advised to wash the pitcher to get rid of any dirt it may have picked up during production. The Brita filter cartridge shouldn’t be washed.
After cleaning the pieces with warm water, dry them off with a fresh hand towel.
Prime the Filter
It is essential to prime the filter before using your Brita pitcher for the first time, as this helps to ensure that the filter is working effectively and that you are getting the best possible water quality. To prime the filter, start by unwrapping it from its packaging, making sure to keep the other cleaned components aside.
Next, hold the filter under the cold water faucet and run the water through it for at least 15 seconds. This step is crucial as it allows the cold water to flush through the filter and remove any loose carbon dust particles that may have collected during production or transit.
By priming the filter in this way, you are helping to ensure that your water is as clean and pure as possible, and that any impurities or contaminants are effectively removed.
It’s important to note that you should always use cold water when priming the filter, as warm water can damage the filter and reduce its effectiveness.
Additionally, you should repeat this process each time you replace the filter, as it helps to ensure that the new filter is working properly and that you are getting the best possible water quality. With sufficient amounts of cold water and proper filter priming, you can enjoy clean, great-tasting water every time you use your Brita pitcher.
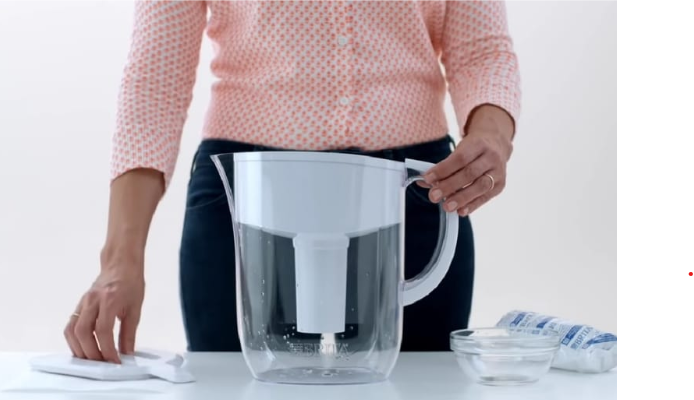
Insert the Filter
Reassemble the pitcher, but don’t put the cover on just yet. Insert the filter lid into the top reservoir’s bottom slot. Verify that the filter is positioned correctly and is at a comfortable height in the hole.
Fill the Upper Reservoir
The pitcher may now be filled for the first time with cold water. Hold the filter beneath your faucet until the water in the top reservoir is all used up. Wait for the water to filter into the bottom reservoir after covering the pitcher to keep anything in the air from contaminating it.
As soon as there is water in the bottom reservoir, you can start drinking from the pitcher. You might need to fill the top reservoir more than once if you wish to fill the full reservoir before using the pitcher. In the Brita water pitcher, avoid using warm water.
How to Use a Brita Water Pitcher On a Daily Basis
It’s simple to use a Brita filter pitcher. The actions you need to do are as follows:
Fill the Pitcher
Hold the pitcher with the lid off under the cold water faucet. Open the faucet and watch as the higher reservoir fills with the cold water from the faucet.
Refill the Pitcher
Watch the water slowly filter into the bottom reservoir as it takes its time. The entire process ought to take around 10 minutes. Refill the top reservoir when the bottom chamber has received half of the water that was in it and let it slowly filter once again. You should have enough water from this to slowly filter and fill the bottom chamber with delicious water.
Store and Use
Reattach the pitcher’s cover and keep it in the refrigerator door until you need it. As long as there is water in the bottom chamber, you can sip filtered water from the pitcher at any time during the filtering process. Don’t let the water sit in the pitcher for more than two days to ensure that you are only drinking fresh water.
Keep Adding Tap Water
One of the great things about owning a Brita water pitcher is that it allows you to enjoy clean, great-tasting water at any time. To ensure that you always have filtered water on hand, it is important to make it a habit to refill the pitcher with fresh tap water after each use.
By doing so, you are taking advantage of the continuous filtration process, which means that you don’t have to wait for a full filtration cycle before enjoying the benefits of freshly filtered water.
Another benefit of regularly adding water to your Brita water pitcher is that it helps to keep the brita filter working effectively. Over time, the brita filter can become clogged with impurities and harmful contaminants, which can reduce its efficiency and effectiveness.
By frequently adding fresh tap water to the pitcher, you are helping to keep the brita filter clean and free of any build-up, which ensures that it is able to work properly and provide you with the best possible water quality.
Additionally, using a Brita water pitcher is an eco-friendly alternative to bottled water, as it eliminates the need for single-use plastic bottles. By refilling the pitcher with tap water, you are reducing your carbon footprint and contributing to a healthier planet.
So, by making it a habit to keep adding tap water to your Brita water pitcher, you can enjoy clean, refreshing water while also doing your part to protect the environment.
How to Add a New Filter to a Brita Water Pitcher
Depending on the type of brita filter you choose for your pitcher, Brita filters last between two and six months. While Brita Water advises replacing the LongLast Brita filters after 6 months, standard filters last just 2-3 months.
Use these procedures to add replacement filters (Longlast brita filters) to a Brita water pitcher:
Remove the Old Filter
When it comes to maintaining your Brita water pitcher, replacing the filter on a regular basis is an essential step. Over time, the brita filter can become clogged with impurities, reducing its effectiveness and potentially even affecting the taste of the water. That’s why it’s important to know how to properly remove the worn out brita filter and replace it with a new filter.
To remove the worn out brita filter, start by removing the pitcher’s cover to gain access to the reservoir. Then, reach inside the reservoir and use the handle to carefully lift out the old filter. Be sure to hold the brita filter upright to prevent any water from spilling out.
Once you have removed the worn out filter, it’s important to dispose of it properly. Brita offers a recycling program for their filters, so be sure to check if this is an option in your area. Otherwise, you can dispose of the brita filter with your regular household garbage.
After removing the old filter, take a moment to inspect the inside of the reservoir for any debris or build-up that may have accumulated. Wipe down the inside of the reservoir with a clean, damp cloth to remove any residue. Once the reservoir is clean, you’re ready to install a new filter and enjoy fresh, great-tasting water once again.
Rinse the New Filter
The replacement filter, Longlast Brita filters, should be taken out of its package and held under running water for up to 15 seconds. The filter will then be primed and ready for use.
Replace the Filter
Make sure the new filter is securely in place and insert the filter into the same compartment at the bottom of the top chamber as the previous one.
Reset the Filter Change Indicator
The Brita filter life is indicated electronically on some Brita filters. Make careful to reset it each time you replace your filters if your pitcher has one of these. As a result, you will always be aware when a new filter is required. The start button should only be pressed and held for up to 10 seconds.
Use the Pitcher
Using your Brita water pitcher is a straightforward process that requires little effort. Once you have filled the pitcher with water, it’s important to wait for the filtration process to finish before consuming the water.
This typically takes a few minutes, depending on the size of the pitcher and the amount of water being filtered. During this time, the water passes through the filter cartridge, which removes impurities and improves the taste and odor of the water.
Once the filtration process is complete, the filtered water is ready for consumption right away. You can pour the water directly from the pitcher into a glass or other container, or use it to make your favorite beverages like tea, coffee, or juice.
It’s important to note that while the Brita water pitcher can remove a wide range of impurities from water, it’s not designed to remove all harmful contaminants.
If you have concerns about the quality of your water or specific harmful contaminants, you may want to consider additional filtration methods or consult with a water treatment professional for better filtered water.
Conclusion
In conclusion, using a Brita pitcher is an easy and affordable way to improve the quality and safety of your water. By following these simple steps, you can enjoy clean, refreshing water at home without the hassle of buying bottled water or installing a complicated filtration system.
Remember to change the filter regularly and follow the manufacturer’s instructions for maximum performance and longevity of your Brita pitcher.